Remember we created a form in HTML, we entered our details and those details were clearly visible in URL. But if we use method="post"inside <form> tag in our HTML file, our details will not be visible. And recall how we used action attribute to send/post the details to some other page, and this page could be any HTML or PHP file. Also remember that whenever you want the user to submit his/her details by pressing a submit button, it is necessary to use form tag.
So here we’ll read those details in PHP file. When we coded that form in HTML file, we used <input> tag and inside it we used attributes/property like type and name. Type was used to specify the type of value the applicant should enter – text, email, password, file, image, color, date, etc. And the name given to name property is used as a key to access the details entered by the applicant in respective fields. So with the help of this KEY only we are going to read the values. This is known as EVENT HANDLING.
So first we’ll make a new PHP file. In that file we have, actually, two ways to read values.
First way
Open PHP file, and type following code and save the file-
<?php
    var_dump($_POST);

?>
$_POST and $_GET are known as Super Global Variables.
But, but, but…first, open your form which we designed in HTML and make some changes there in coding. Look there you must have opened <form> tag and inside that you must have written name= ” ” , method=” ” and action=” “. Right.
- In name you can give any value that doesn’t matters, in method you should write either method=”post” or “get” .I am considering that you are aware of meaning of both of these. In action, we write the name of that file where we want to post the information submitted by applicant.
- So, the above PHP code which I have written, you type it save it with extension .php.
- The name which you are giving to this PHP file is important. Why important? Because we want the data to be displayed in this PHP file only, so quickly go back to your HTML code (code where we designed the complete form), inside the <form> tag, in action= ” “ , between the double quotes type the name of your PHP file, which you just saved. Done!
- And before running your this HTML file, note that if you have written method=”post” inside <form> tag, then above PHP code which I have written is valid but if you have written method=”get”, then you need to make just a small change in above PHP code, write
var_dump($_GET). That’s it ! - You can now safely run your HTML file (not PHP file because you created PHP file just to get the information filled by user in the form and that form is designed in HTML file).
- Fill the details and click on submit button.
- You will get an output displaying all the information. You need to look carefully and understand the format of output, it will help in displaying individual values in PHP. Got it!
Now you must have got that the output we are getting is in the form of Associative Arrays. Why Associative Arrays? Because, look carefully, the names which we assigned in our HTML file inside the <input> tag are now acting like keys…Yes ! Now it will be quite easy to access the values associated with those keys.
So again quickly jump to your PHP code and add some lines-
<?php
    var_dump($_POST);

    echo $_POST['mob']."<br>";
    echo $_POST['fname']."<br>";
    echo $_POST['mname']."<br>";

?>
I have printed just three values, you may print all your values through the value of name which you gave in your HTML file. But printing individual values in this way is tiring.
So, let’s understand the second way to print values.
Second WAY
This is easy. Believe me. As we saw that the output we get after submitting our form is stored in associative array (key-value pair). We have an excellent in-built function extract(). It does all the job for us. Look at following code first –
<?php
    extract($_POST);

    echo $mob."<br>";
    echo $fname."<br>";
    echo $mname;

?>
We know, that $_POST or $_GET is an associative array name which has key-value pairs. So what extract() function does is- it converts keys into variables. And when keys are converted into variables we can simply print them through echo. This is simpler than previous method.
While displaying values you may face problem in printing the values of radio buttons and checkboxes. So let’s solve that. Open your ‘form’ code which, of course, you must have saved in some HTML file. There in gender you must have used two input tags (one for male other for female) with type=”radio”. Inside both input tags use two more properties- name property and value property. Carefully, give same name in name property in both input tags. While in value property, write value=”Male” in male input tag and value=”female” in female input tag. Now, run the output fill the form click on submit and you will surely get the right gender. And if you are not getting, then please share your problem here in comments so that I may help.
In case of checkboxes, the name which we give in the name property inside <input> tag should be an array and you should write some value in value property also. Let me explain with one example below-
<input type= "checkbox" name="chk[]" value="Reading blogs">Reading Blogs
<input type= "checkbox" name="chk[]" value="Net Surfing">Net surfing
<input type= "checkbox" name="chk[]" value="Programming">Programming
<input type= "checkbox" name="chk[]" value="Travelling">Travelling
I expect you must have got some idea how to do it. I haven’t taken any row or column, I have just given an idea of “hobbies” how you should write inside input tag. You must write this inside some row. I randomly picked some line.
I am telling to run HTML file and not PHP file and I have, above, given a valid reason also why to do so. But what if you run your PHP file without running your HTML file, of course errors will come. But if you make sure that PHP file should run only if user presses SUBMIT button in his/her form, then no error will be displayed. We’ll just do a little coding in our PHP file for this.
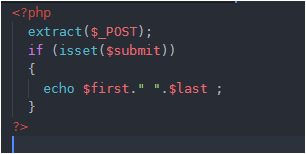
We have learnt that we first convert all the keys into variables through extract(). Right. To check if an applicant has pressed the SUBMIT button, we use isset($var_name).
So when an applicant presses SUBMIT in the form, the name in name property inside <input> tag is SET or ON. Coming back to our PHP code, after extracting values if the user would have pressed SUBMIT, then the name which i have taken “subBtn” would be ON or SET. Now, if I pass the name of name inside if (isset($subBtn)) then the condition will be true. Why True? Because $subBtn has now become a variable after being extracted through extract(). And when I am saying that an applicant has pressed SUBMIT button that means subBtn is ON or SET or TRUE. And so the block inside if(isset($subBtn)) will surely run. You can print all your values inside if block. And if an applicant would not have pressed SUBMIT then subBtn will be UNSET or OFF or FALSE, so the block inside if you will not run and so you will not get any error.
I have tried to explain this in most plain words, but if there is some problem please ask…That’s your HUMAN RIGHT 🙂
Doing just this much is not at all enough. We’ll do 2 more things for practice in event handling-
1- We’ll go to our calculator, and print the result there itself in result box. Click here.
2- we’ll create a login page and check if user is valid or not. Click here.
THAT’S ALL ! Please follow this blog so that you may get updates of the latest posts.
Have ERROR FREE coding.