After creating models, we know, we have to run ‘makemigrations’ command in the console so that our database is prepared with all the columns in it which we defined in our models.py file inside an app. Suppose you created a registration form and you displayed it in your website. Now if someone registers himself/herself and then wishes to see his/her profile or even if admin wishes to see the data of his customer in the website (not in database) then it means we have to plan something so that the data submitted by the customer which is stored in our database could somehow be fetched and presented in the webpage.
Thats what we are going to do here. I will simply fetch the data from database without focusing on its presentation in the webpage.
MySQL is a Relational Data Base Management System (RDBMS). You may be thinking what is the difference between RDBMS and DBMS. Let me answer this –
RDBMS is, actually, a database in which data is stored in tabular form and these tables are linked together for better access, storage and manipulation of data. These usually have a Primary Key (a unique value of every record is declared as primary key). In DBMS, data is stored in file format. It has one parent node and zero, one or more child nodes. It can be stored in graph form also.
And we have to study only about RDBMS. It’s easy…
In a database, data is stored in tables in an organized form. And inside the tables, each record is stored in rows. One record in one row. By record I mean to say full information of any entity. For example – if I want to store Name, Author, Ratings of five books, I will do this in five rows. How? I will, first, create a table in a database. Within that table I will draw five rows(for five books) with three columns in it (one for Name, one for Author, and last one for Ratings) . It’s just like a common table we usually make. And remember whatever commands we give inside database, we do it through queries, and MySQL understands Structured Query Language. These queries are of SQL. Thus we can say we use SQL to execute queries in MySQL.
Let’s do it practically, but for this there are some requirements. The easiest one is to install a server(wamp or xamp). As soon as you will activate it click on MySQL and then on MySQL console. I haven’t described the installation process, I think you can do that. After this you will get a console window, press enter when it asks for password. If you want to confirm that everything is working fine, write use databases ; after mysql prompt.
Now, we will implement the same example of ‘books’ which we discussed above. Follow the steps as I do, things will be easier-
For creating a table, first we need to create a database and name it. Remember one more thing that we do not create different databases for different tables. A database can have many many tables. We create our own database just to name a location where our data, be it of books or students or any library or any organization, could be stored. Getting? If not then write your doubt in comments. Now, lets execute our queries –
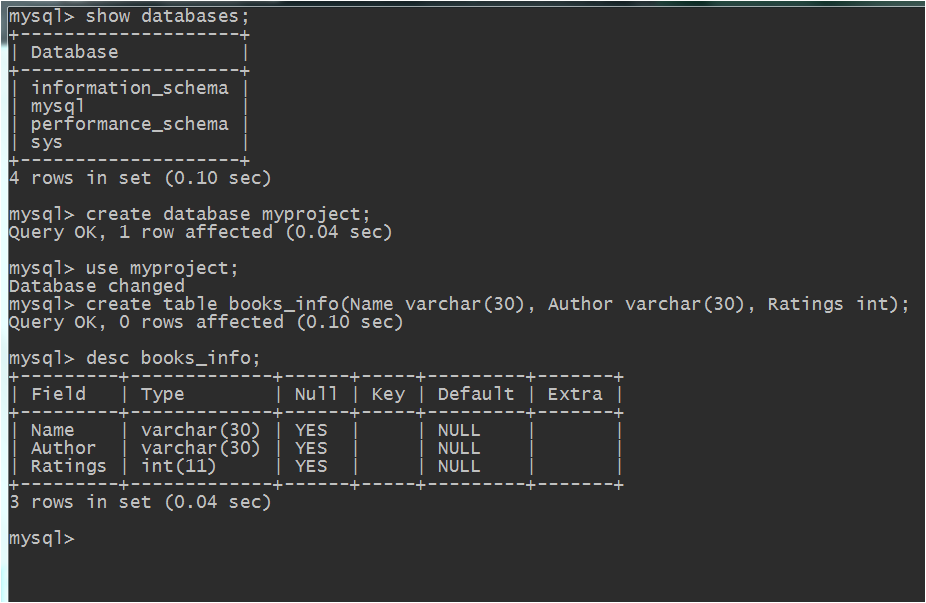
queries to create a database, create a table, and to show description of table
In the above image-
The query to create a database is – create database myproject; I have taken the name of my database as myproject, you may take of your choice.
In order to use that database the query is – use myproject. Now we can formally create our table.
To create a table, the query is – create table books_info(Name varchar(30), Author varchar(30), Ratings int); In above query table_info is the name of my table (you may take whatever you want) and inside the parentheses we pass the names of columns in which we want to store data, we also pass the datatype of that column (for string ‘varchar’ is used, for integers ‘int’ is used, for any date ‘date’ is used) and the maximum size which could be used to store that data. I have taken size as 30 each for Name and Author, for int no size is required.
Now if you want to take a look at your table information you may use this this query – desc books_info;
Remember that even a small mistake may spoil your result. So be careful. In case you face some error and you are tired of typing the same query again and again, use upward arrow key to retain your previous queries. Keep pressing that key until you get the required key, make the required changes and execute it again.
Till now we have created just the structure of our table, we haven’t stored any data in it. For storing data, see the queries used in image below-
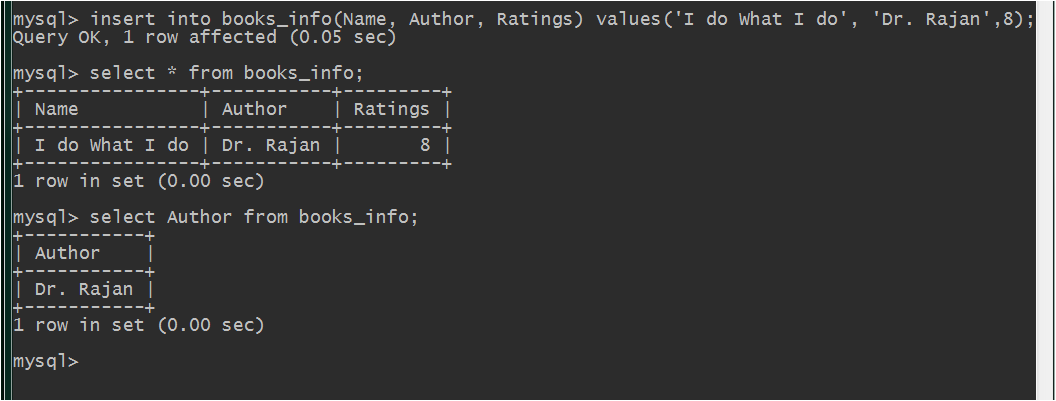
query to store data in table
In above image, the first line I have written is the query to store information of a book in the table. In this query, inside the first parentheses we write those column names in which we want to store data. I wanted to store data in all three columns so I have written all the three column names (Name, Author, Ratings), you may also chose all the three columns or any two or even one. In the next value() parentheses, we give value to those columns which we mentioned in our first parentheses and in the same sequence. Remember that all strings and date should be within single quotes.
After writing this query if you want to see whole data of your table, use query – select * from books_info; But if you want to see the data of any one or two column, write the query as – select Author from books_info; In this query I have stated only one column name, if you want to display the data of two columns, write query as – select Name, Author from books_info; . In these queries if anything is unclear please write your doubt in comments section.
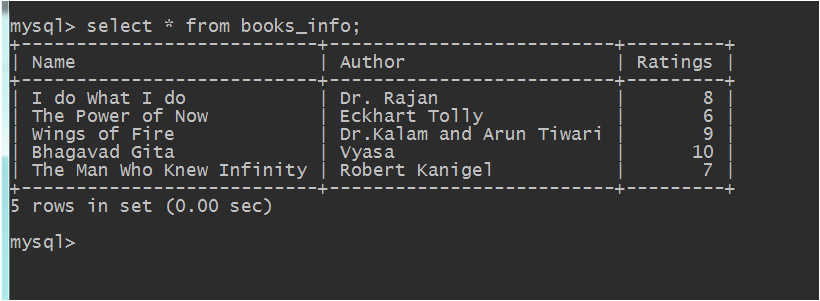
So, we have successfully stored the information of a book ; remember we decided to store the information of five books. So for storing the data of second book, press upward arrow key from your keyboard. Keep pressing the key slowly until you get your original query (which you used to store information of first book). When it is retained, press right or left arrow key or delete or backspace key (as required) to store new data for second book. You can repeat the same process to store the data of five books.
Look I have done the same and got following table –
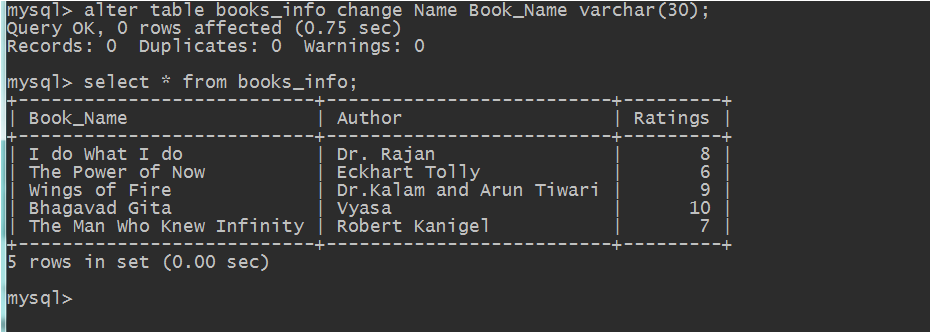
There are many other queries but we will execute them whenever we will need them. Right now I want to change the name of my column name from ‘Name’ to ‘Book_Name’. For this following query is used –
alter table books_info Name Book_Name varchar(25); Here I have reduced the size also from 30 to 25 and datatype will remain same – varchar.