Event Handling

Let’s create a simple web page where a user will give his first and last name and we’ll display his full name (by concatenating first and last name) in some other web page.

So we’ll make two files – one HTML file and one PHP file. HTML file will be for designing the layout where user will enter his first and last name and PHP file will be for generating logic to display his full name at once.

The HTML file I have designed is something like below –

<html>
  <head>
    <title>FIRST AND LAST</title>
  </head>
  <body text="darkgreen">
    <br><br><br>

    <form name="myform" action="firstand lastname.php" method="post">
    <fieldset>
      <legend>USER INFO</legend>
      <table>
        <tr>   <td>First Name</td><td><input type="text" name="first"></td>     </tr>
        <tr>   <td>Last Name</td><td><input type="text" name="last"></td>      </tr>
        <tr>   <td><input type="submit" name="submit" value="SUBMIT"></td>    </tr>
      </table>
    </fieldset>
    </form>
  </body>
</html>

Please take note of this that whenever we place any submit button in form, it is compulsory to use <form> tag. So in above code inside <form> tag I have used action=” “ . In action I have given the name of my php file which contains logic to display full name. You may give name of your PHP file inside action. So the PHP code I wrote in my PHP file is-

In PHP code, I have first extracted the keys into variables. (Actually the keys are the name which we give inside <input> tag in HTML file. You may check this using var_dump($_POST)) .

So converting keys into variables allows us to handle them as normal variables in PHP. Using isset($submit) tells us whether SUBMIT button is pressed or not. (submit is the name of my SUBMIT button in my HTML code, if you have given some other name use that name) . If SUBMIT is pressed then the first and last name will be concatenated with a space in between. And we will simply echo this. ($first and $last are my name which I have given to first and last name respectively in my html code, yours might be different so use that)

Save both your PHP and HTML file in Documents Tool Folder (www) and run your HTML file (not PHP).

That’s it.

Have ERROR FREE coding!

Internal Linking in HTML file…

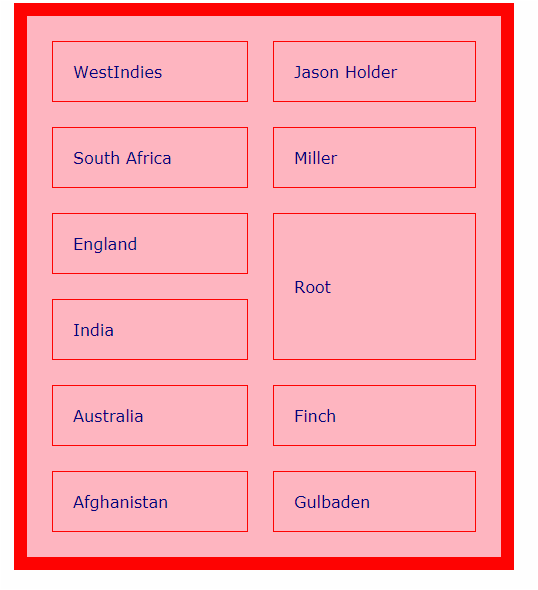
Getting goosebumps? or Excited ? 🙂

Have patience because today we’ll design the same page. And what is shown above is not the complete design, there is a lot to scroll down. But believe me, this is going to be really fantastic and you will enjoy designing this page. Imagine, how will you feel after you have designed your page fully.

What is needed is your complete attention and focus. I will upload whole code here (it is a little big because I have embedded whole speech so as to show internal linking). But but but… watching that code will not make you learn new things, rather you should code yourself and if you are facing any problem then you can refer to my code just for hint. So honesty need to be applied here… 🙂

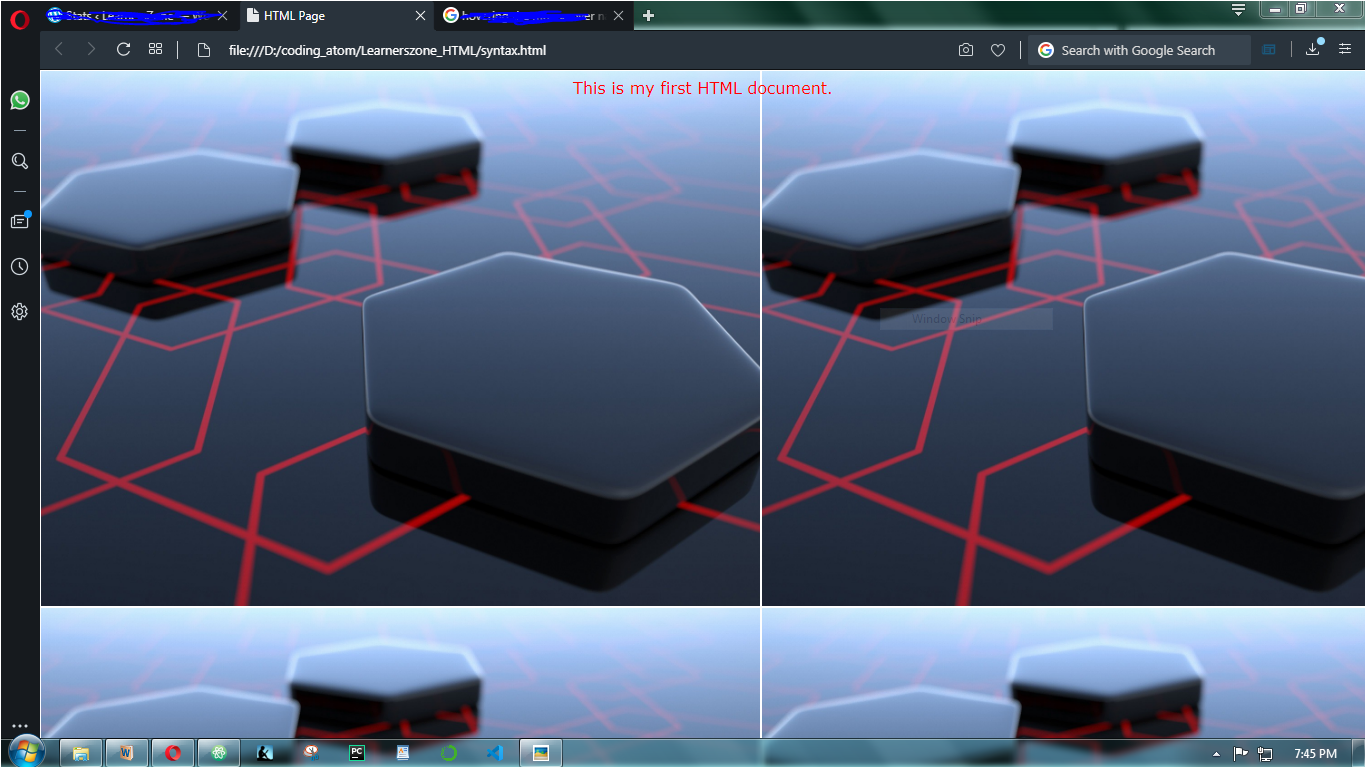
Internal Linking is very much useful in web pages containing large documents where there are some links at starting of the page and on clicking those links we reach to our desired content in the same page. Usually, the links are at beginning of page but they can be anywhere. It could be on bottom of page to reach top of the page.

For internal linking <a></a> anchor tag is used. If I have designed a web page with three big stories in it. Then what I’ll do is I will add three links at the starting of my page which will straightly direct the reader to the required story. And this same thing I have implemented in my self-designed web page.

In above screenshot, I have added five links in my page if you’ll click first one you’ll reach first story in one go without scrolling and this applies to all the remaining four links.

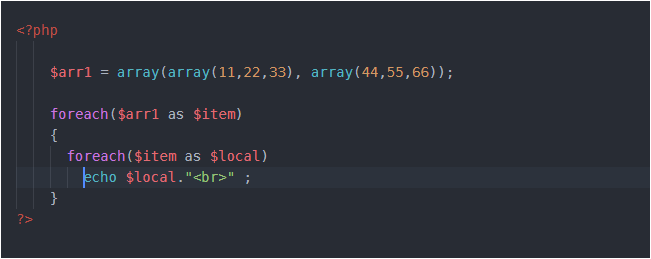
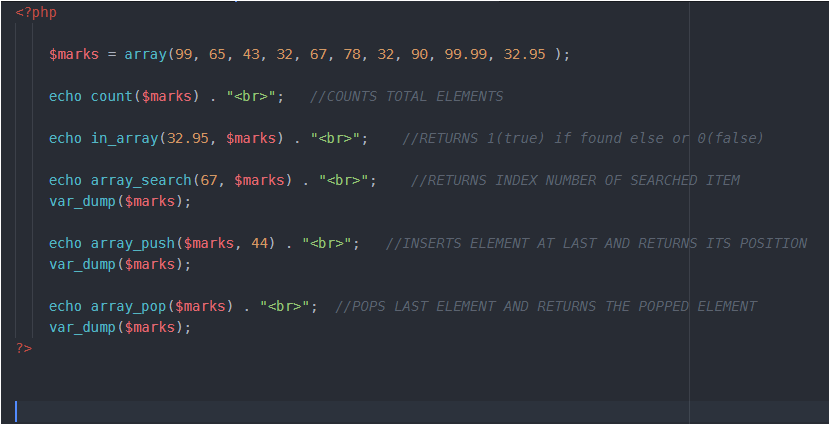
I am now uploading my code so that you can see how anchor tags are used-

<html>
  <head>
    <title>About Us</title>
  </head>
  <body text="darkcyan" bgcolor="azure" align="center">

      <br><br>
    <hr color="darkcyan" size="15" width="600px">
    <a name="top">  <h1 size="6">Speech at Stanford</h1>  </a>
    <hr color="darkcyan" size="15" width="600px">

    <br><br>
    <img src="stevejobs.jpg" alt="Commencement Address" border="10">

    <br><br>
    <a href="#first">Click here to reach First story</a>            <br><br>
    <a href="#second">Click here to read Second story</a>           <br><br>
    <a href="#third">Click here to read Third story</a>             <br><br>
    <a href="#video">Click here to watch video</a>                    <br><br>
    <a href="#end">Click here to get to the END of the Speech</a>   <br><br>


    <pre>
    <font size="5">
    <p>I am honored to be with you today at your commencement from one of the finest
      universities in the world. I never graduated from college. Truth be told, this
      is the closest I’ve ever gotten to a college graduation. Today I want to tell
      you three stories from my life. That’s it. No big deal. Just three stories.

      <b><u><a name="first">The first story is about connecting the dots.</a></u></b>

      I dropped out of Reed College after the first 6 months, but then stayed around
      as a drop-in for another 18 months or so before I really quit. So why did I drop out?

      It started before I was born. My biological mother was a young, unwed college
      graduate student, and she decided to put me up for adoption. She felt very
      strongly that I should be adopted by college graduates, so everything was all
      set for me to be adopted at birth by a lawyer and his wife. Except that when
      I popped out they decided at the last minute that they really wanted a girl.
      So my parents, who were on a waiting list, got a call in the middle of the
      night asking: “We have an unexpected baby boy; do you want him?” They said:
      “Of course.” My biological mother later found out that my mother had never
      graduated from college and that my father had never graduated from high school.
      She refused to sign the final adoption papers. She only relented a few months
      later when my parents promised that I would someday go to college.

      And 17 years later I did go to college. But I naively chose a college that was almost
      as expensive as Stanford, and all of my working-class parents’ savings were being spent
      on my college tuition. After six months, I couldn’t see the value in it. I had no idea
      what I wanted to do with my life and no idea how college was going to help me figure
      it out. And here I was spending all of the money my parents had saved their entire life.
      So I decided to drop out and trust that it would all work out OK. It was pretty scary
      at the time, but looking back it was one of the best decisions I ever made. The minute I
      dropped out I could stop taking the required classes that didn’t interest me, and begin
      dropping in on the ones that looked interesting.

      It wasn’t all romantic. I didn’t have a dorm room, so I slept on the floor in friends’
      rooms, I returned Coke bottles for the 5¢ deposits to buy food with, and I would walk the
      7 miles across town every Sunday night to get one good meal a week at the Hare Krishna
      temple. I loved it. And much of what I stumbled into by following my curiosity and intuition
      turned out to be priceless later on. Let me give you one example:

      Reed College at that time offered perhaps the best calligraphy instruction in the country.
      Throughout the campus every poster, every label on every drawer, was beautifully hand
      calligraphed. Because I had dropped out and didn’t have to take the normal classes,
      I decided to take a calligraphy class to learn how to do this. I learned about serif
      and sans serif typefaces, about varying the amount of space between different letter
      combinations, about what makes great typography great. It was beautiful, historical,
      artistically subtle in a way that science can’t capture, and I found it fascinating.

      None of this had even a hope of any practical application in my life. But 10 years later,
      when we were designing the first Macintosh computer, it all came back to me. And we
      designed it all into the Mac. It was the first computer with beautiful typography.
      If I had never dropped in on that single course in college, the Mac would have never
      had multiple typefaces or proportionally spaced fonts. And since Windows just copied
      the Mac, it’s likely that no personal computer would have them. If I had never
      dropped out, I would have never dropped in on this calligraphy class, and personal
      computers might not have the wonderful typography that they do. Of course it was
      impossible to connect the dots looking forward when I was in college. But it was
      very, very clear looking backward 10 years later.

      Again, you can’t connect the dots looking forward; you can only connect them looking
      backward. So you have to trust that the dots will somehow connect in your future.
      You have to trust in something — your gut, destiny, life, karma, whatever. This
      approach has never let me down, and it has made all the difference in my life.

      <u><b><a name="second">My second story is about love and loss.</a></b></u>

      I was lucky — I found what I loved to do early in life. Woz and I started Apple in
      my parents’ garage when I was 20. We worked hard, and in 10 years Apple had grown
      from just the two of us in a garage into a $2 billion company with over 4,000
      employees. We had just released our finest creation — the Macintosh — a year earlier,
      and I had just turned 30. And then I got fired. How can you get fired from a company
      you started? Well, as Apple grew we hired someone who I thought was very talented
      to run the company with me, and for the first year or so things went well. But
      then our visions of the future began to diverge and eventually we had a falling out.
      When we did, our Board of Directors sided with him. So at 30 I was out.
      And very publicly out. What had been the focus of my entire adult life was gone, and
      it was devastating.

      I really didn’t know what to do for a few months. I felt that I had let the previous
      generation of entrepreneurs down — that I had dropped the baton as it was being passed
      to me. I met with David Packard and Bob Noyce and tried to apologize for screwing up
      so badly. I was a very public failure, and I even thought about running away from the
      valley. But something slowly began to dawn on me — I still loved what I did. The turn
      of events at Apple had not changed that one bit. I had been rejected, but I was still
      in love. And so I decided to start over.

      <a name="video">
         <video controls="true" autoplay poster="stevejobs.jpg">
          <source src="SPEECHjobs.webm" type="video/mp4"> 
         </video></a>

      I didn’t see it then, but it turned out that getting fired from Apple was the best thing
      that could have ever happened to me. The heaviness of being successful was replaced by
      the lightness of being a beginner again, less sure about everything. It freed me to
      enter one of the most creative periods of my life.

      During the next five years, I started a company named NeXT, another company named
      Pixar, and fell in love with an amazing woman who would become my wife. Pixar went
      on to create the world’s first computer animated feature film, Toy Story, and is
      now the most successful animation studio in the world. In a remarkable turn of events,
      Apple bought NeXT, I returned to Apple, and the technology we developed at NeXT is
      at the heart of Apple’s current renaissance. And Laurene and I have a wonderful family
      together.

      I’m pretty sure none of this would have happened if I hadn’t been fired from Apple.
      It was awful tasting medicine, but I guess the patient needed it. Sometimes life hits
      you in the head with a brick. Don’t lose faith. I’m convinced that the only thing that
      kept me going was that I loved what I did. You’ve got to find what you love. And that
      is as true for your work as it is for your lovers. Your work is going to fill a large
      part of your life, and the only way to be truly satisfied is to do what you believe is
      great work. And the only way to do great work is to love what you do. If you haven’t
      found it yet, keep looking. Don’t settle. As with all matters of the heart, you’ll know
      when you find it. And, like any great relationship, it just gets better and better as
      the years roll on. So keep looking until you find it. Don’t settle.

      <b><u><a name="third">My third story is about death.</a></u></b>

      When I was 17, I read a quote that went something like: “If you live each day as if it
      was your last, someday you’ll most certainly be right.” It made an impression on me,
      and since then, for the past 33 years, I have looked in the mirror every morning and
      asked myself: “If today were the last day of my life, would I want to do what I am
      about to do today?” And whenever the answer has been “No” for too many days in a row,
      I know I need to change something.

      Remembering that I’ll be dead soon is the most important tool I’ve ever encountered
      to help me make the big choices in life. Because almost everything — all external
      expectations, all pride, all fear of embarrassment or failure — these things just fall
      away in the face of death, leaving only what is truly important. Remembering that you
      are going to die is the best way I know to avoid the trap of thinking you have something
      to lose. You are already naked. There is no reason not to follow your heart.

      About a year ago I was diagnosed with cancer. I had a scan at 7:30 in the morning,
      and it clearly showed a tumor on my pancreas. I didn’t even know what a pancreas was.
      The doctors told me this was almost certainly a type of cancer that is incurable, and
      that I should expect to live no longer than three to six months. My doctor advised me
      to go home and get my affairs in order, which is doctor’s code for prepare to die. It
      means to try to tell your kids everything you thought you’d have the next 10 years to
      tell them in just a few months. It means to make sure everything is buttoned up so
      that it will be as easy as possible for your family. It means to say your goodbyes.

      I lived with that diagnosis all day. Later that evening I had a biopsy, where they
      stuck an endoscope down my throat, through my stomach and into my intestines, put a
      needle into my pancreas and got a few cells from the tumor. I was sedated, but my wife,
      who was there, told me that when they viewed the cells under a microscope the doctors
      started crying because it turned out to be a very rare form of pancreatic cancer that is
      curable with surgery. I had the surgery and I’m fine now.

      This was the closest I’ve been to facing death, and I hope it’s the closest I get for
      a few more decades. Having lived through it, I can now say this to you with a bit
      more certainty than when death was a useful but purely intellectual concept:

      No one wants to die. Even people who want to go to heaven don’t want to die to get
      there. And yet death is the destination we all share. No one has ever escaped it.
      And that is as it should be, because Death is very likely the single best invention
      of Life. It is Life’s change agent. It clears out the old to make way for the new.
      Right now the new is you, but someday not too long from now, you will gradually
      become the old and be cleared away. Sorry to be so dramatic, but it is quite true.

      Your time is limited, so don’t waste it living someone else’s life. Don’t be trapped
      by dogma — which is living with the results of other people’s thinking. Don’t let the
      noise of others’ opinions drown out your own inner voice. And most important, have the
      courage to follow your heart and intuition. They somehow already know what you truly
      want to become. Everything else is secondary.

      When I was young, there was an amazing publication called The Whole Earth Catalog,
      which was one of the bibles of my generation. It was created by a fellow named
      Stewart Brand not far from here in Menlo Park, and he brought it to life with his
      poetic touch. This was in the late 1960s, before personal computers and desktop
      publishing, so it was all made with typewriters, scissors and Polaroid cameras.
      It was sort of like Google in paperback form, 35 years before Google came along:
      It was idealistic, and overflowing with neat tools and great notions.

      Stewart and his team put out several issues of The Whole Earth Catalog, and then
      when it had run its course, they put out a final issue. It was the mid-1970s,
      and I was your age. On the back cover of their final issue was a photograph of an
      early morning country road, the kind you might find yourself hitchhiking on if
      you were so adventurous. Beneath it were the words: “Stay Hungry. Stay Foolish.”
      It was their farewell message as they signed off. Stay Hungry. Stay Foolish. And I
      have always wished that for myself. And now, as you graduate to begin anew, I wish
      that for you.

      <a name="end"> Stay Hungry. Stay Foolish.</a>

      Thank you all very much.

      <a href="#top"><img src="arrow.png" width="45px" height = "45px"></a>
    </pre>

    </p>
    </font>
  </body>
</html>

This code is lengthy just because I have included his whole speech. Believe me it’s super easy.

In above code, look in lines- 16,17,18,19,20. I have used <a></a>. And inside anchor tag, I have given some name to href and that name begins with #. And between anchor opening <a> and closing </a> tags, I have placed the string which I want user to read. In line 16, I have typed – ‘Click here to reach First story’, this means i want the reader to go to the first story in case he clicks in that line. The location where I want to send the reader is line 30. So concentrate in line 30, there too I have used <a></a> but this time the the name of href is not preceded by #. So this is the basic difference between the use of anchor tags- in the link where the reader actually clicks and the location where the reader should reach upon clicking that link. Note the difference carefully.

Now let’s look at line 17. Here I have placed the string “Click here to read second story”, that means I want the reader to reach to the second story, which is at line 87, after clicking this link. So, in line 87, I have used anchor tag and href property, but note that the name of href is not starting with #, whereas the link which we want the user to press to reach second story(in line 17) contains #.

So with the help of above examples, you must be clear how to perform internal linking. And yes you can give any name to href, but the name should be same in both places (in link and at location where the reader should reach upon clicking the link). Instead of text/string which I have used in line 16, 17, 18,19, 20, we can also use any image to allow user to click on that image to reach the desired location. Nothing extra needs to be done. You just need to put your <img> tag (to insert image) between <a> and </a>. Look at line 208 for hint. I have inserted an image so as to reach to top. So, I have given #top name to href inside anchor opening tag and at top of the page look at heading line 9, there I have used the same name top. This clearly means that if reader clicks that image on the bottom of the page, he will quickly reach to the top, no matter what is the length of the page.I hope this is quite clear now. 🙂

I know, you guys must be wondering what I have done to line 19? Where it is linking? Okay so look at line 109. Don’t get confused, it is simple. I have just embedded a video there with the help of <video> tag and have smartly placed this video tag inside anchor tag so that when user clicks on line 19 at the top,(which is a string- Click here to watch video), he is likely to reach the place where I have embedded an inspirational video. Yes, it’s truly inspirational.

You may proudly watch that video after having completed your this project.

I have used one more tag <pre></pre> and I have never used this before. This actually preserves the text. If you want to copy-paste some matter from a site to your web page and you want that it should look exactly as it was looking in that site. Then you can safely use <pre> tag. Do it yourself without and with the use of <pre> tag, you will surely get it. Try it yourself, you will be better understood.

That’s all. Hope you like this. And I think solving errors and issues and doubts make the topics more clear. So please, if you have any issue, share it here in comments and you will get back the reply. Suggestions are also welcomed… 🙂

Have ERROR FREE coding !

Media files in HTML


<html>
  <head>
    <title>AUDIO and VIDEO</title>
  </head>
  <body align="center">

    <br><br>
    <embed src="alarm.png" width="600px" height="300">

    <br><br>
    <audio controls="True" >
      <source src="song.mp3" type="audio/mp3">
    </audio>

    <br><br>
    <video controls="true" autoplay poster="posterimage.jpg">
      <source src="RT.mp4" type="video/mp4">
    </video>

  </body>
</html>

To insert audio in our web page, we use <audio></audio> tag. Inside this tag, put controls=”true” (please see above code for hint) in order to play audio file. Remember that the audio file which you are going to insert should be placed inside the same folder in which your current html file is placed. Usually, audio files have ‘.mp3’ extension but it can be .wav or .ogg so you should be careful for extension. Inside the <source> tag, place name of audio file with extension and type=”audio/mp3″ will remain same for all extension.

The same rules apply for <video></video> too. Look above code for help.(Pay attention to extension of video file).

<embed> tag allows to insert either audio or video or image file. (Look above code to get a hint.)

That’s it for media files.

Have ERROR FREE coding !

Please share your doubts here, if any.

Forms in HTML continued…

In the previous post we designed a good-looking form. Yes we did that (you should proudly smile for that). And now we’ll move a step further.

But before making any changes in the coding of our previous form, let me introduce you with my next post which will be a fantastic layout of a Home Page . So don’t miss it, it will be a whole FUN, I guarantee.

We can limit the user/applicant to enter only valid details in a form. For this we need to add some attributes inside <input> just like we have learnt to add type and name attribute. In the same manner we’ll add the following attributes-

required=”true” . In whichever field (by field i mean whether name or qualification or address or any field of your form) you use this property, that field will become mandatory to be filled in order to submit the form.

<tr><th>Name</th><th><input type="text" name="name" required="true"></th></tr>

I have implemented in only one field, you may apply to all (I am making changes in same form we designed in previous post).


placeholder=”Enter your name” . You may use this as-

<tr><th>E-mail</th> <th><input type="email" name="mail" required="true" placeholder="Enter your email"></th></tr>

I have used this placeholder in my email field, you may use in any field and can give any name in placeholder.


maxlength=” “ with this you may restrict the applicant to limit the text upto a certain length. This text could be his name or introduction or anything text-based.

Just like maxlength, max and min are used to limit numbers. These are also attributes inside <input>, so you can put nthem there and run the code. You may use this max and min even in date. Remember the pattern yyyy-mm-dd

<tr><th>DOB</th> <th><input type="date" name="dob" required="true" max=2020-10-19 min="2008-04-19"></th></tr>

QUERY STRING

Query String is the means to send information from one page to other through Uniform Resource Locator. In previous post we have seen how the information given by an applicant is shown in the url. Even the password is clearly visible. It means we cannot give sensitive information through this. But there is a way out. With the use of method = “post ” attribute inside <form>, we can hide the information. Please do it yourself and check the url after submitting the form.

Till now the information was loaded in the same page in which the form was displayed but if we want to send that information to some other page( this could be a html or php or any file which could be opened on browser), we can do so. This is done using action attribute inside <form> tag. We can give some name of other html file in the action and run the code. And be sure that the file whose name you are going to put in action is in the same folder. This time as soon as you will submit the form , you will be directed to that page whose name you have given in action. Let me quickly show you that line of code-

<form method="post" action="syntax.html">

By default method is get.

That’s it for this post. I have tried to keep this short and simple. But if you have any doubt share your problems here in comments. And follow this blog so that you may know about new posts.


Have ERROR FREE coding !

Designing Forms in HTML

Forms provide a formal way to get information from client/user.

With HTML, we can create forms too. The basic idea is to create a table and add various fields using the <input/> tag. Note that input tag is a singular tag.

Let me show you a basic structure first-

Above code looks complex, but believe me its super easy. I have first done some formatting inside the <body> just to make the page look good. You can ignore doing this.

Then, I have created a table using <table> tag. I have done some formatting here also, just to make the table look good. And I believe you are aware of all the tags and their properties used till here (till table tag).

Now, inside table tag I need to create several rows with two columns each. One column for field name other for user input.

Since I need several rows, I will use <tr> for each row and in order to store some data in it we will use <th> . Remember it is a table heading tag which makes the content inside a cell as bold and aligned at center. <input> tag is used to take input from the user.

Inside <input>, we have to specify what type of input we want from user- text( used to take input in the form of text from the user so that’s why in above code I have used it while taking the name, father’s name, mother’s name from the user) or number (used to take number from user) or email (takes email from user) or password (a secret code from user as password) or date (takes date from user) or radio button (used to allow user to choose any one option among many) or checkbox (used to allow user to choose many options or even user can select all options).

Please note that, in case of radio buttons if you select all the all the radio buttons, then all will be selected. And this is something we do not want. We want only one radio button to be selected. For this, we add one property ‘name‘ in all the radio buttons and the name for the name should be same for all. You could write something like this…

<tr><th>Gender</th> <th><input type="radio" name="gen1">Male
                              <input type="radio" name="gen1">Female</th></tr>

You can give name any name of your wish. And if you want to know the use of this name, then after completing your coding part fully run your code in browser ( run your code after reading the whole post), fill all the details and then click on SUBMIT button (adding SUBMIT button and its proper working is shown at last). After you SUBMIT, look at your web page’s URL before and after filling the form. I hope you got the thing.


To give a address field, we use <textarea></textarea> tag . It has some properties like rows, columns. You can give values as per our needs. You can very easily add this field in your form using following code-

<tr><th>Address</th> <th><textarea rows="7" cols="30"></textarea></th> </tr>

To add a qualification field in our form, we can give a drop down list to user to select any one option from that list. This dropdown list is useful than giving radio buttons because it will take much lesser space than radio buttons. So, to allow user to select any one item from the list we use <select></select> tag. After <select> , we need to give options to be displayed in the drop down list. These options are placed inside <option></option> We can add this ‘qualification’ field using following code-

To give a color field in our form, we can use input type as color. To allow user to upload his/her image we will have to use input type as file. The code for both these field will be-

<tr><th>Color</th> <th><input type="color"></th> </tr>
<tr><th>Image</th> <th><input type="file"></th> </tr>

Almost everything is added in our form, feeling Happy… Wait ! Wait ! . We have forgotten to add ‘submit’ , ‘reset’ button. We can even give an image which will act like submit button. Seeeee… the code below-

After adding your submit button, if you run your code in browser, fill details and click SUBMIT, you’ll experience no changes, nothing will take place. To make the SUBMIT work add <form> just below <body> and close </form> just before </body>.

Your final code would be like this clean code (it is really a good habit to write a clean and readable code) –

<html>
  <head>
    <title>Forms in HTML</title>
  </head>
  <body text="black" bgcolor="lightblue">
    <form >

    <table bordercolor="black" bgcolor="lightgray" cellspacing="0" cellpadding= "8px"
            border="10" align="center" width="500px" >

      <tr><th>Name</th><th><input type="text" name="name"></th></tr>
      <tr><th>Father's Name</th> <th><input type="text" name="fname"></th></tr>
      <tr><th>Mother's Name</th> <th><input type="text" name="mname"></th></tr>
      <tr><th>Mobile no.</th> <th><input type="number" name="mob"></th></tr>
      <tr><th>Password</th> <th><input type="password" name="pwd"></th></tr>
      <tr><th>E-mail</th> <th><input type="email" name="mail"></th></tr>
      <tr><th>Gender</th> <th><input type="radio" name="gen1">Male
                              <input type="radio" name="gen1">Female</th></tr>
      <tr><th>DOB</th> <th><input type="date" name="dob"></th></tr>
      <tr><th>Address</th><th><textarea rows="5" cols="30" name="add"></textarea></th></tr>

      <tr><th>Qualification</th><th><select name="qul">
                                    <option>**Select</option>
                                    <option>Phd</option>
                                    <option>Mphil</option>
                                    <option>MBA</option>
                                    <option>GateRanker</option>
                                    <option>Mtech</option>
                                  </select></th></tr>

    <tr><th>Color</th><th><input type="color" name="color"> </th></tr>
    <tr><th>Image</th><th><input type="file" name="img"> </th></tr>

    <tr><th colspan="2"><input type="submit">
                        <input type="reset">
                        <input type="image" src="wallpaper.jpg" width="50px" height="40px">
        </th></tr>

    </table>
  </form>
  </body>
</html>

Now, our form is complete… You can save the code and run it… You will get a wonderful output. Look what I am getting in my browser…

We will see some more features in our next continued post


Have a ERROR FREE coding !

Table in HTML

Tables are a great way to integrate your content in lesser space. Now, the question is how to make them in HTML. Well, HTML provides a <table></table> tag to insert your table in HTML page. Suppose, I want to create a table to record a top player from each cricket team (World class) .Let me first show you a basic structure-

So, a table is created inside <table></table> tag. Then, to insert a row (remember rows are horizontal, columns are vertical), we use <tr></tr> (table row) tag . Inside <tr>, we use <td></td> (tabular data) . Within <td></td>, we write our content of table. So, where are columns?

The content which you will insert inside <td></td> will make a separate column. For eg. in above code, I have used two <td></td> tags inside each row. It means, I have designed 4X2 table (4 rows, 2 columns).

The output of above code will be something like-

This border may differ in other browsers. I am using advanced version of Opera, so its something different from other browsers. For practical, try running the code after removing border property inside <table> tag and see the effect.

Like this border property, we have many more properties which we can use inside table tag, I will share some common ones-

width – sets the width of table ; align – positions the table in the web page ; bgcolor – sets the background color of the table ; background – we can set image as the background of the table, but remember that image should be in the same folder.

cellspacing – cells are the boxes which contains our content. In above code, I have created 8 cells look carefully. So the space between these cells is cell spacing and we can use this property to increase/decrease the space between cells.

cellpadding – the space between cell and the content in that cell is cell padding.

Let’s implement the above properties in one code. You can create your own table simply by playing with the values in each property.

original table

And it will result the following output-

We can set the content of each row in center by inserting align property – <tr align="center"> or if we wish to align the content of particular cell use- <th align="center">.

We can add heading for each column using <th> tag. We need to replace <td> with <th>. That’s it ! . Content inside ‘th’ tag is always in bold, as well as, is aligned at center. . It works as follows-

We only need to look at the first line. Look, I have used <th> in first row to make ‘Country’ and ‘Player’ as heading of their columns. Now look at its output-


Now, if we want to merge two rows, we use rowspan and if we want to merge two columns, we use colspan.

Suppose, if we want to merge ‘Root and Rohit’ into one and name it as ‘Root’, then this is called rowspan. It’s code will be-

And this will output –

Similarly, if we want to merge columns then –

Run above code and analyse the result. For better understanding of rowspan and colspan, compare both the above codes with original code.


<caption></caption> tag is used to set a small 2-3 word title for the table. Remember it is a paired tag, since it has both opening and closing tags. Caption tag is used after all the rows are done, but before the end of </table> table tag.

So just before this tag </table>, we can write –

<caption align="bottom">Table 8.1</caption>

This will insert a caption at the bottom of the table. We can use align as “top” also, as per our preference. And can insert any piece of content, I have written ‘Table 8.1’, you can write anything.


If you face any issue in above post,share here in comments.

Have ERROR FREE coding.

HTML continued… (2)

We have discussed many basic tags of HTML in our previous post.

Here, we will see 2 important topics-

MARQUEE tag

Marquee is such an amazing tag, you can play with it using some of its fascinating properties. You might have seen in some sites there is some image or a text which moves either from left to right or right to left or top to bottom or bottom to top. This movement is due to the use of <marquee>. Look below-

<marquee> tag has three basic properties – scrollamount (decides the speed of movement), behavior (this includes scroll, alternate or slide) and direction (it includes the direction of motion right, left, top, bottom). Try changing the result of these properties and analyze the result by yourself.

Instead of text, we can add any image or even a link to other page and it will also move in the page as per the properties which you will set. Let me now, quickly show you a code with image, as well as a link as a moving item-

In above code I have inserted two <marquee> tags. First <marquee> tag makes a image move while second one is the movement of link. And I have given that link a name ‘Be better at coding’. So you will see this line- ‘Be better at coding’ move and if you click on this line you will jump to some other web page. Remember that to insert any link in a web page, we use <a></a> anchor tag. And inside anchor tag we give the address of page, in which we want to jump, to href. And so, I have done the same thing.

If you run the code as it is, you will see some wonderful result. But again remember that the image should be in the same folder in which your HTML file is located. I have saved my image with “images” and so I have used that name in my HTML file. You should write your image’s name.


Now, while the link or image or text moves in the page, we have no control to stop that. But HTML provides some events using which, if you bring/hover your mouse pointer over that moving image/ text it will stop. And as soon as you remove your mouse pointer, the image/text will resume its movement. So, the two events are- onmouseover and onmouseout. We want that if we bring the mouse pointer over the image or even in its path of movement, it should stop moving and if we remove the mouse pointer over that image, it should start moving. These two actions – stop and start are performed using stop() and start() function. These will be implemented as follows-

I have tried to make this post simple. So, iof you have any confusion or doubt, share it in comments below so that it can be resolved.

Have ERROR-FREE coding…

HTML Basics

HTML is Hyper Text Markup Language. It is used in designing of structure of web pages and these web pages when are linked together, they form a website.

Hyper Text is something more than the normal text. It is basically, the text displayed on the computer screen or other presentational devices with references (hyperlinks) to other text. Hyperlink is the link upon clicking which we navigate to some different web page.

Markup means that HTML is tag based language. It refers to the sequence of characters or other symbols(tags). Tags are, in some way, like instructions that are embedded into text to perform formatting. They signal web browser to add some features in the normal text.

HTML is interpreted by browser, it can be embedded in text to add formatting and links to other web pages.

Every HTML document(web page) starts with <html> and closes with </html>. The basic structure looks something like-

After <html> tag, comes the <head> tag. Inside <head> tag, we can have <title> or <style> or <link> or <meta> tag.

<title> tag encloses the title of your HTML document. Let me show you the output of above code in my browser…

Now you must have understood <title> tag’s use. Whatever the text we want to be visible in the white screen above, is placed inside <body> tag.

We can insert many properties inside body tag to make our content in the web page look good. Following are some commonly used tags-

bgcolor – used to set background color of web page ; text – used to change the color of text in the web page ; align – used to set the position of text ; background – used to set the image in the background of page.

Here, the point to note is- keep the image in same folder where you have saved your HTML file. And it will be more good if you create your separate folder and store all the HTML files as well as all photos in same folder.

Many face difficulty in setting background. They pay too much attention in the extension of image and as a result they download some image from web and save it as “some_name.jpg”. This should not be done. You save it just with “some_name”, do not insert “.jpg” by yourself. It is automatically done. And even some images are of “.png” extension and many more extensions are available. So after saving your image, to know of what extension your image is – just hover your mouse over the name of image in the folder where you have saved. That will let you know the extension of image. And now you can insert that extension in your HTML file along with name of image.

So the output of above code is-

If you are unable to get the extension, please share your problem in comments here, I will suggest another solution.

Have a ERROR-FREE code !

continued…

Default value arguments in PHP

Functions can be inbuilt or user-defined, inbuilt functions are ready made ones, these include array(), var_dump(), array_search(), there are many…

When we create functions, they are termed as user- defined functions. In user defined functions we pass some values in it those values are passed as formal parameters inside the function. Let me show you an example-

One thing to note in above code is- we can call our function anywhere in program irrespective of its position of function definition. In program, I have called calci() 2 times and it is valid in PHP.

The variables $a,$b,$c,$d are formal parameters and their scope is limited within function only. They do not exist outside function. While the values passed during calling of function 4,6,8,82 are actual parameters.

Imagine if $a, $b, $c, $d are prices of four items and what if price of $d remains same every time. We can do it in following way-

In above code, I have set $d as default value argument i.e. by default its value will be 82. In case you want to pass your own value, you can do so. In that case 82 will be over-written by your value.

What happens is – the values 4,6,8,82 goes to $a, $b, $c, $d respectively. When we make $d as default argument, the values 4,6,8 goes to remaining three variables.

Suppose we want to make $a and $d both as default value arguments, then ? We all will quickly do this-

function calci($a=4, $b, $c, $d=82)

and in function calling – calci(6,8);

But no, this is absolutely wrong . Because how will PHP know that it has to copy the value 6 to $b. PHP will copy 6 to $a and 8 to $b and then no value for $c, and no value for $d also. But remember that $d is in last and it has its default value, so no matter if $d gets value or not, it has it’s own value. But the problem is for $c. So what to do now? Relax and look at the following code-

What I have done is- I have written all default arguments ($a ,$d) at last. Now, the value 6 is copied to $b, the value 8 is copied to $c and no value is copied to $a and $d. But this is not an error here, because both of these have their default arguments with them.

So the conclusion is always keep default value arguments at the end of the list.

I hope this is clear, if not, then no problem comment your doubt here and it will be resolved and you will feel SUPER GOOD.

Have a ERROR-FREE coding…

PHP – Arrays

Arrays store multiple items, yes that’s absolutely true. But it’s different from the arrays used in C. In PHP, arrays can hold items of different datatype unlike in C. Following array is valid in PHP –

array() is an inbuilt function in PHP used to define/initialise an array.

var_dump() is also an inbuilt function used to display complete information about any variable. For an array, the information includes- size of array, type and index number of each item, length of string incase item is string. This function, var_dump() can be used with any variable. (Try it yourself)

To access each element, we could run ‘for’ loop or ‘foreach’ loop. I will explain the working of ‘foreach’ loop in 2D-array.


2D- arrays

In above example, I created an array $arr1 with 4 items in it. As you can see first item in $arr1 is 23, what if instead of this 23, I create an array in its place. Got confused ! Relax and look at example below –

What I have done is- I have replaced 23 with an array of size 3 (11,22,33) and “brinjal” with another array of size 3 (44,55,66) i.e. arrays inside array. Thus I have created 2 arrays inside an array. Got it ! . This is 2D- array.

In above example, array with elements (11,22,33) is one row and an array with elements (44,55,66) is second row. Look below-

Now if you want to access 55, then you’ll write $arr[1][1] . Here, first 1 represents row number and second 1 represents column number. And you are aware that indexing starts with 0. Right !

To access 2D-array, we can use either ‘for’ loop or ‘foreach’ loop. The working of ‘for’ loop is same as in C, so here we’ll see ‘foreach loop’ –

We need to pass 2 arguments in foreach loop. One is the array name and second any temporary variable which holds item present in array. So, first time when we used foreach loop there $item variable was holding first item in array $arr1 which is itself an array. This means we need to run one more foreach loop. Why ? Because we have an array as the first item inside $arr1. When we have reached second foreach loop, here $item is holding an array with 3 items in it (11,22,33) and the variable $local at first time will hold the first item in $item and it is 11, then it will hold 22, then 33 and at last we will be out of the second foreach loop. Now in the first foreach, $item will hold second item in $arr1 which is again an array. That means we need second foreach loop, and the values will get printed like this…


Associative arrays

Here, values are associated with their respective keys. Or we can say mapping is there. These look like as follows-

Each element/value is linked with its key. Here, ‘bot’, ‘OYO’, ‘swigggy’, ‘RomanReigns’ are keys and the values on right side of this symbol ‘ => ‘ are values. The symbol ‘=>’ is used to associate key with value. I have given random values just to make this funny, you may insert some meaningful data.

We can add some key value externally also as I have shown in above program. We can also have any datatype in keys and values, I have taken as string but it could be a number also , an integer or floating type.

There could be a question- what if, we add some value externally without specifying its key. Just as –

$verify[] = "onion"; (Try it yourself and see the result using var_dump($verify))


Some useful functions in array

Here the important thing is to run above code and analyse the output carefully.

In above array remember, that total elements are 10 but indexing is from 0 to 9.

array_push() always inserts element at the end and outputs the position (not index number ) of last inserted item, the one it has just inserted. In above code, 44 will be inserted at index 10 but at position 11. Using var_dump, you’ll see that 44 is inserted at last.

array_pop() removes last element and returns the same .In our code the last inserted element is 44, so it will be popped out and returned.