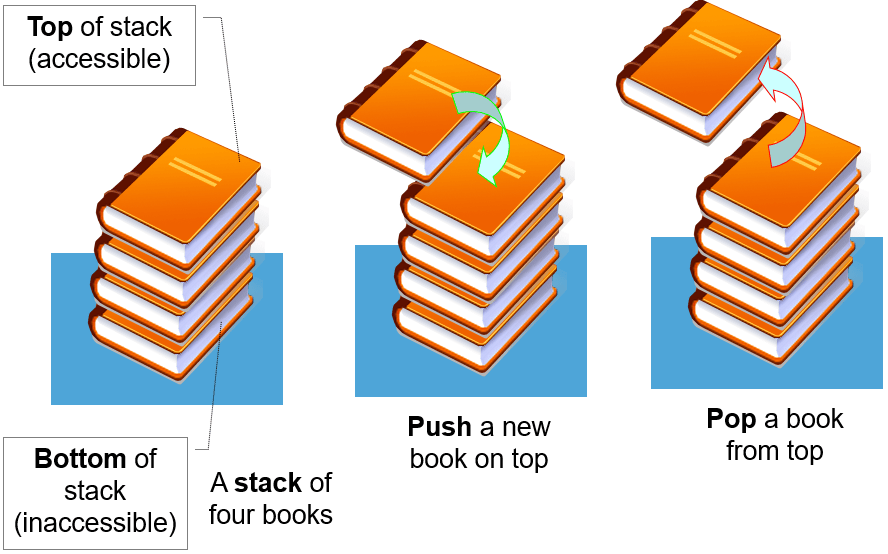
LearnersZone brings a compact form of common programming concepts. Each topic has explanation and readers are requested to post their queries, if any.
The topics can cover any programming language.
So without expanding our intro, LET’S GET STARTED…
LearnersZone brings a compact form of common programming concepts. Each topic has explanation and readers are requested to post their queries, if any.
The topics can cover any programming language.
So without expanding our intro, LET’S GET STARTED…

After creating models, we know, we have to run ‘makemigrations’ command in the console so that our database is prepared with all the columns in it which we defined in our models.py file inside an app. Suppose you created a registration form and you displayed it in your website. Now if someone registers himself/herself and then wishes to see his/her profile or even if admin wishes to see the data of his customer in the website (not in database) then it means we have to plan something so that the data submitted by the customer which is stored in our database could somehow be fetched and presented in the webpage.
Thats what we are going to do here. I will simply fetch the data from database without focusing on its presentation in the webpage.

First : I will extend my registration form fields other than what is ready made available in Django in-built forms.
So if you were looking for such forms you are at right place.
Here is the coding –

First uploading code of these files –
Not many things to change – Insert these lines at the end…

in Databases variable delete all the content and insert this –

In Templates variable look for ‘DIRS’ key and write this –

Inside ‘INSTALLED APPS ‘ variable add your app. In my case its ‘homepage’. Like this –


# dappx/forms.py
from django import forms
from django.contrib.auth.models import User
# from django.contrib.auth import get_user_model
from homepage.models import UserProfileInfo

class UserProfileInfoForm(forms.ModelForm):
    class Meta():
        model   = UserProfileInfo
        fields  = ('fullname', 'address', 'city','mobile_no','alt_mob_no','other_ref_names')

class UserForm(forms.ModelForm):
    password    = forms.CharField(widget=forms.PasswordInput())
    class Meta():
        model   = User
        fields  = ('username','password','email')
# from django.db import models

# Create your models here.

# dappx/models.py
from django.db import models
from django.contrib.auth.models import User
# from django.contrib.auth.models import AbstractBaseUser, BaseUserManager
# from django.contrib.auth import get_user_model

class UserProfileInfo(models.Model):
   fullname             = models.CharField(max_length=30)
  #  password             = models.CharField(blank=False, max_length=25)
   address              = models.TextField(blank=False, max_length=50)
   city                 = models.TextField(blank=False, max_length=20)
  #  email                = models.EmailField(max_length=60, verbose_name='email', unique=True)
   state                = models.TextField(default="Uttar Pradesh")
   mobile_no            = models.IntegerField()
   alt_mob_no           = models.IntegerField()
   profile_pic          = models.ImageField(upload_to='profile_pics',blank=True)
   user                 = models.OneToOneField(User,on_delete=models.CASCADE)
   date_joined          = models.DateTimeField(verbose_name='date joined', auto_now_add=True)
   other_ref_names      = models.TextField(max_length=100)


   def __str__(self):
     return self.user.username

from django.shortcuts import render
from homepage.forms import UserProfileInfoForm, UserForm
from django.contrib.auth import authenticate, login, logout
from django.http import HttpResponseRedirect, HttpResponse
from django.urls import reverse
from django.contrib.auth.decorators import login_required

def index(request):
    return render(request,'indexn.html')

@login_required
def special(request):
    return HttpResponse("You are logged in !")

@login_required
def user_logout(request):
    logout(request)
    return HttpResponseRedirect(reverse('index'))

def register(request):
    registered = False
    if request.method == 'POST':
        user_form = UserForm(data=request.POST)
        profile_form = UserProfileInfoForm(data=request.POST)
        if user_form.is_valid() and profile_form.is_valid():
            user = user_form.save()
            user.set_password(user.password)
            user.save()
            profile = profile_form.save(commit=False)
            profile.user = user
            if 'profile_pic' in request.FILES:
                print('found it')
                profile.profile_pic = request.FILES['profile_pic']
            profile.save()
            registered = True
        else:
            print(user_form.errors,profile_form.errors)
    else:
        user_form = UserForm()
        profile_form = UserProfileInfoForm()
    return render(request,'registeration.html',
                          {'user_form':user_form,
                           'profile_form':profile_form,
                           'registered':registered})

def user_login(request):
    if request.method == 'POST':
        username = request.POST.get('username')
        password = request.POST.get('password')
        user = authenticate(username=username, password=password)
        if user:
            if user.is_active:
                login(request,user)
                return HttpResponseRedirect(reverse('index'))
            else:
                return HttpResponse("Your account was inactive.")
        else:
            print("Someone tried to login and failed.")
            print("They used username: {} and password: {}".format(username,password))
            return HttpResponse("Invalid login details given")
    else:
        return render(request, 'login.html', {})

Well, in below code I have used CSS along with HTML. This is not the developer’s way to do. They actually do so in separate folder named ‘static’ but due to my interest and convenience I have used the same HTML page. But its not an issue. All is good. Do as you are convenient.
<!DOCTYPE html>
<html>
  <head>
    <meta charset="utf-8">
    <title>Base</title>
    <style>
      body{
        margin: 0px;
      }
      .emptyhead{
        height: 30px;
        background-color: #ff6f61;
      }
      .navbar{

        overflow: hidden;
        overflow: hidden;
        background-color:  black;
        position: fixed; /* Set the navbar to fixed position */
         /* Position the navbar at the top of the page */
        width: 100%; /* Full width */
      }

      /* Links inside the navbar */
      .navbar a {
        float: left;
        display: block;
        color: #f2f2f2;
        text-align: center;
        padding: 14px 16px;
        text-decoration: none;
        margin-left: 6px;
        font-size: 22px;
      }

      /* Change background on mouse-over */
      .navbar a:hover {
        background: #ddd;
        color: red;
      }

      /* Main content */
      .main {
        margin-top: 80px; /* Add a top margin to avoid content overlay */;
      }
      .head{
        margin-top: 50px;
        background-color:  #ff6f61;
        color: white;
        height: 100px;
        font-size: 50px;
        font-family: monospace;
        font-weight: bold;
        text-align: center;
        padding: 35px;
      }
    </style>
</head>
  <body >
{# Django Home Link / Admin Link / Register Link#}
    <div class="emptyhead">

    </div>
    <div class="navbar">
          <a href="{% url 'index' %}">About Us</a>
          <a href="{% url 'admin:index' %}">Admin</a>
          <a href="{% url 'homepage:register' %}">Register</a>
          {# Some logic on what to display for last item#}
          {% if user.is_authenticated %}
            <li><a href="{% url 'logout' %}">Logout</a></li>
          {% else %}
            <li><a href="{% url 'homepage:user_login' %}">Login</a></li>
          {% endif %}
    </div>
    <div class="head">
      PROVISION STORE MANAGEMENT SYSTEM
    </div>
    <div class="main">
    {% block body_block %}
    {% endblock %}
    </div>
  </body>
</html>


OVER!
Yes, over only thing you have to do is to download WAMP and through phpmyadmin create a database ‘provisionstore’. If you want to name something different then change the name in dj3 pic posted above too.
Happy Coding !
Please, Please, do ask your confusion. If any. Thanks 🙂
Django is a Python web framework. Framework is a collection of multiple Python Modules. A Module is any Python file.
For example – Suppose you created a Python program which can set a connection with the database and then saved it with the name dataPro.py then this is a Python file or a module. And such useful modules serving different purposes can be packed to produce a complete framework.
When multiple modules, each consisting of libraries, classes and logical functions and variables, which serves as a time-saver and provides clean and pragmatic way to build wholesome software products as well as allows the developer to start the things not from the scratch thereby saving the time which could have been invested in coding the basic logic which is used in almost all websites building.
There are many web frameworks, Django is just one. And Yes, Frameworks and Libraries are two different things. Below two Quora answers will better make you understand in case there is any doubt…

And this too…
Now coming specifically to Django. Many content makers claim its an easy framework. But let me warn for all the self learners this is gonna be most difficult thing. Yes it is difficult but not impossible. Just as in the movie the Imitation Game , I am not like the below Commander 🙂
IF you haven’t watched the movie yet, I will recommend you to leave everything and jump to it.Really!
Django is a web framework used to create dynamic awesome web pages.
I will go through step by step.
python -m venv venv. Here second ‘venv’ is the name of Virtual Environment.In django every functionality of a website can be called as an app. Yes, suppose you have a website and in that you want some menu items like – About, Contact, Blog, Projects to be listed in your menu. Then these all can be handled very easily and cleanly considering them as apps.
By default Django uses ‘sqlite’ as database. We can change it to some other which I will share in some time.
After following above steps you will see a folder named mysite inside myprojects folder. Now don’t think that you did something wrong because inside mysite folder there is another folder named mysite along with a manage.py file.
This manage.py is of great use. It is used for running server, creating a superuser who handles admin panel, creating apps accessing sqlite (if you wish) and other core tasks.
Now cd to mysite folder, which is inside myprojects folder, from the console. And there type- python manage.py runserver and in the console window itself you will get a url similar to 127.0.0.1:8000. ‘127.0.0.1’ is localhost and ‘8000’ is port number.


Type the same address in google address bar and SMILE you are ready to head on an amazing journey. You shall see a 0 level static webpage. You have to build something fruitful, make it dynamic, more powerful and attractive so that it is helpful and worth showing to someone. Follow my next post to build a simple registration, login, logout page in django.
Thank You !
Functions provide code re-usability i.e. once a function is written can be invoked anytime upon need.
They have one disadvantage too. They take more time to implement because the control has to jump from normal code to the functions and then returns back to the calling environment. This is known as Context Switching.
Information or data is passed to functions through parameters, if needed. Functions can be with or without parameters.
Functions if needed, can return some value or values or even a function. Thus function can have or cannot have return type.

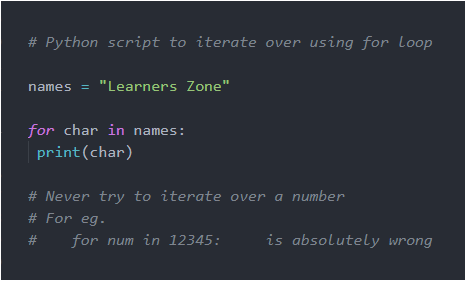
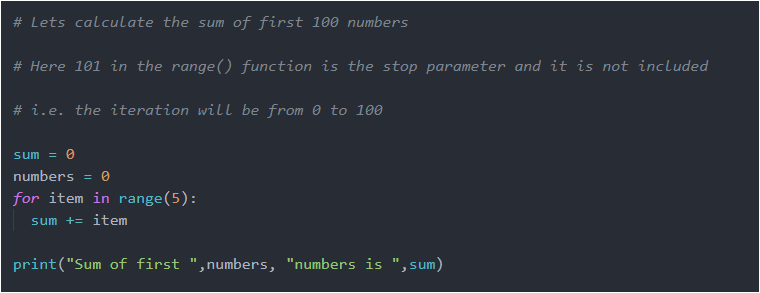
List Comprehension is an excellent way to define a new List in just a single line.
Syntax: [function for var in iterable ]
—–> Let’s print all numbers within a given range

—–> Let’s print all numbers within a given range after adding 5 to them

—–> Let’s print all even numbers within a given range

Notice that function/expression is inserted at first place , for loop at second place and condition numbers%2==0 is inserted in the last.
List comprehension can be nested too.
Let me explain how.
Suppose we have a list of lists as-
myList = [ [11,22,33], [44,55,66], [77,88,99] ]
And I wish to print it in a flat format like this- 11, 22, 33, 44, 55, 66, 77, 88, 99.
Normally, we use following logic for implementation-

But things become Super Duper Easy when we implement using List Comprehension.

Okay so in above code, the control first is at for Lst in myList then it goes to for nums in Lst
and then it finally prints the nums . This follows exactly in the same sequence as in the code which is implemented without list comprehension.
—-> Now let’s print all Prime numbers using List Comprehension

—-> Print all Armstrong numbers within a given range


That’s it !
Happy Coding!

#             BOOKING MANAGEMENT SYSTEM
# 1. View all Seats
     # seats are from 1 to 50 only

# 2. Booking
     # On Booking, the seat changes from 1 to B
     # If seat is already booked, then display a message

# 3. Cancellation
    # Change seat number from B to original number

# 4. Exit


print("\n\n\n-----------------------------------------------------------------------------")
print("-------------------------   Welcome to Python Booking System ------------------")

Seats = []
allBookedSeats =[]
check = True
for seat in range(1,51):
    Seats.append(seat)

while check:
    print()
    print("-------------------------------------------------------------------------------")
    print('''\n     Press
           1. View All Seats
           2. Book Your Seat
           3. Cancel your Booking
           4. Exit from System
        ''')
    print("-------------------------------------------------------------------------------")
    choice = int(input("Enter Your choice: "))


    # 1. ------------------------------------ View ALL Seats
    if choice==1:

        for seat in Seats:
            print(" ",seat, end=' ')
        print()


    # 2. -------------------------------------- Booking Seats
    if choice==2:
        show = 0

        # Show All Booked Seats to User
        print()

        for book_seat in allBookedSeats:
            print("Seat No.: ",book_seat+1," is Booked" )
            show += 1
        if show==0:
            print("All seats are Empty")

        # Booking Seats
        print()
        print("To book Your seat, Enter an Empty Seat Number: ")
        seat_num = int(input())
        if Seats.count(seat_num):
            Seats[seat_num-1] = 'BOOKED'
            allBookedSeats.append(seat_num-1)
            print("Your Seat is Successfully Booked! ")
        else:
            print("Oops! Seat is already Booked")

    # 3. ------------------------------------------ Cancel Booking
    if choice==3:
        cancel_seat = int(input("Enter Seat Number to cancel Your Booking: "))
        if type(Seats[cancel_seat-1])==int:
            print("This seat is already vacant ")
        else:
            Seats[cancel_seat-1] = cancel_seat
            print("Seat is Successfully Cancelled! ")

    # 4. ------------------------------------------ Exit
    if choice==4:
        check = False

#                             EMPLOYEE MANAGEMENT SYSTEM

# 1. View all the details of employees
# 2. Inserting a new Employee
# 3. Deleting details of an Employee
# 4. Updating
# 5. Searching
# 6. Exit
print("\n----------------------------------------------------------------")
print('''Press:
                1 - View All Details of Employee
                2 - Insert New Employee
                3 - Delete an Employee
                4 - Update Employee's info
                5 - Search Details of an Employee
                6 - Exit
                ''')
print("----------------------------------------------------------------")
emp_exit= True
Employee = []


while(emp_exit):
 print("\n----------------------------------------------------------------")
 choice = int(input("Enter Your Choice: "))

 #--------------------------------- View all details of Employee
 if choice==1:
  if len(Employee)==0:
   print("No Employees' details exists in the System")
  else:
   for employees in Employee:
    print(employees)

 #-------------------------------- Inserting New Employee
 if choice==2:
  print("You need to give Details Of Employee ")
  emp_id = int(input("\tID: "))

  # Checking Duplicate ID
  dup_id = 'NO'
  if len(Employee)!= 0:
   inc = 0
   for allemps in Employee:
    if Employee[inc][0]==emp_id:
     print("Oops! Employee with this ID already exists...")
     dup_id='YES'
     break
    else:
     inc += 1
  if dup_id=='NO':
   emp_name = input("\tName: ")
   emp_dept_no = int(input("Department No.: "))
   emp_salary = int(input("Salary: "))
   employees = []
   employees.append(emp_id)
   employees.append(emp_name)
   employees.append(emp_dept_no)
   employees.append(emp_salary)
   Employee.append(employees)

 #--------------------------------- Deleting Employee
 if choice==3:
  if len(Employee)==0:
   print("System contains 0 records...")
  else:
   inc = 0
   print("Do you want to Delete an Employee from the system?")
   ans = input("Yes/No ").upper()
   if ans=="YES":
    del_id = int(input("Enter ID of Employee which you want to Delete "))
    for allemps in Employee:
     if Employee[inc][0]==del_id:
      del(Employee[inc])
      inc += 1
     else:
      print("This Employee doesn't exist in the System")
      break
   else:
    pass

  # --------------------- Update Details of Emps
 if choice==4:
   if len(Employee)==0:
    print("System contains 0 records...")
   else:
    print("Please give ID of the Employee whose info you want to Update... ")
    updat_id = int(input("ID: "))
    print('''Press
              'N' for updating Name
              'S' for updating Salary
              'D' for updating Dept ID
              ''')
    ans = input().upper()
    inc = 0
    id_match_found = False
    for allemps in Employee:
     if Employee[inc][0]==updat_id:
      id_match_found = True
      if ans=='N':
       allemps[1] = input("Enter New Name of Employee ")
      if ans=='S':
       allemps[3]= int(input("Enter New Salary "))
      if ans=='D':
       allemps[2]= int(input("Enter New Dept. ID "))
     else:
      inc += 1

    # if ID is wrongly entered, then a message is sent to the user
    if not id_match_found:
     print("Oops! No Employee with this ID exists...")

 # ---------------------------- Searching an Employee
 if choice== 5:
  if len(Employee)==0:
   print("System contains 0 records...")
  else:
   inc = 0
   print("Enter ID to search an Employee ")
   search_id = int(input())
   for allemps in Employee:
    if Employee[inc][0]==search_id:
     print(allemps)

 #------------------------------- Exit option
 if choice==6:
  emp_exit = False


Pass is used when we are not known how this condition should be handled but it is known that this condition is sure to occur. Remember, we cannot leave the body empty of any condition or any function.
Pass means nothing, it just passes the control to very next statement, if present.

Break allows to terminate from the loop/iteration immediately without executing the following statements in the loop, if the condition isn’t satisfied.

Continue allows to skip only the current event if condition isn’t satisfied and proceed with the iteration.

range(start, stop, step)
Above syntax is of range() function. It has 3 parameters:


Run the above codes and analyse the output. If any doubt feel free to post your problem in comments below.
Happy Coding!

Normally, a class member (instance variables or methods) is accessed only through an object of its class. However, it is possible to create a member that can be used by itself without reference to a specific instance.
To create such a member, we precede its declaration with static keyword.
Any static member can be accessed before any object of its class are created or even exist.In simple language you can understand that static members don’t care of instantiation (object creation) of its class. They are always available.
Both variables and methods can be static.
The most common example is main() method. It is declared as static because it is called before any object exists. static allows main() to be called without having to instantiate a particular object of class. This is necessary since main() is called by JVM before any objects are made.
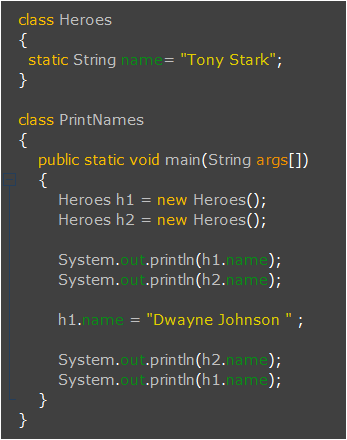
When objects of such a class, in which instance variables are declared as static, are created, no copy of static variable is made. That static variable exists singly- the original. Let me show this with couple of codes (first code is the normal program without static and second code is with static) –
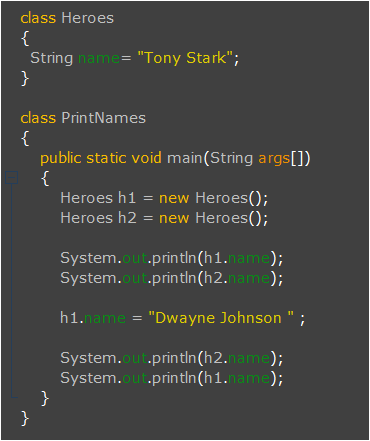
Above code and its output should be quite clear. I have created two objects (h1, h2) of class ‘Heroes’ and first printed the ‘name’ of both these objects. Look they give same output because I have initially initialized the ”name” with ‘Tony Stark’. Don’t get confused that only one ‘name’ is shared by both objects. This is not the case, both have separate memories for their particular ‘name’. Then I have changed the ‘name’ attribute of h1 and then again printed the ‘name’ of both the objects. In this case the name attribute of h2 remained same (‘Tony Stark’) while that of h1 changed to ‘Dwayne Johnson’. This clearly shows that both the objects do have separate memory allocation for ‘name’. This means two copies of ‘name’ are created – one for h1 and other for h2. Right !
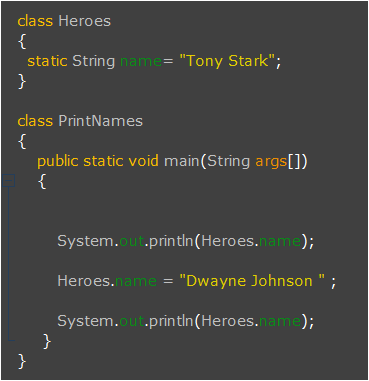
Now look carefully the following code where I have made just a small change- ‘String name’ to ‘static String name’ in second line.
In above code, both objects (h1 and h2) share same memory so if changes are made in h1, it is clearly reflected in h2. I hope you got it… Thus all instances of the class share the same static variable.
Methods declared as static have following restrictions:
this or super.Let me give you an example –
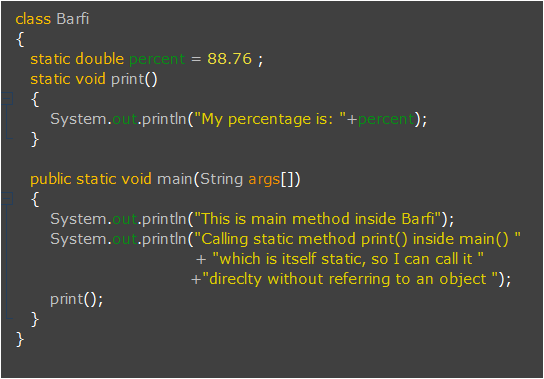
In above example, one instance variable – ‘percent’ is static and print() method is also static so they can be directly accessed in any static method. Since main() is static so look how it directly accesses other static members (percent and print()) of class.
We can use static block also. It is actually used to initialize static members of class. And important thing to note is it is executed before main(), so yes if you are thinking to run your program without main() it will run if you have static block. That’s why this concept is invalid in current versions of JDK.
It is not at all useful in current versions of Java. So let’s focus only on important things. 🙂
Not much tiring, especially when you are dealing with static members. Static members are accessed by the use of the dot operator on the name of class. In Program-2 I have accessed static members through objects but let me tell you this is not at all needed, this is wasteful. You can access them directly. I showed that to you just to make the difference clear between static variables and non-static variables.
Now look at this code, I even don’t need to create objects to access them, however we can create when needed.
That’s it for static…
Have a good time !