


Forms provide a formal way to get information from client/user.
With HTML, we can create forms too. The basic idea is to create a table and add various fields using the <input/> tag. Note that input tag is a singular tag.
Let me show you a basic structure first-
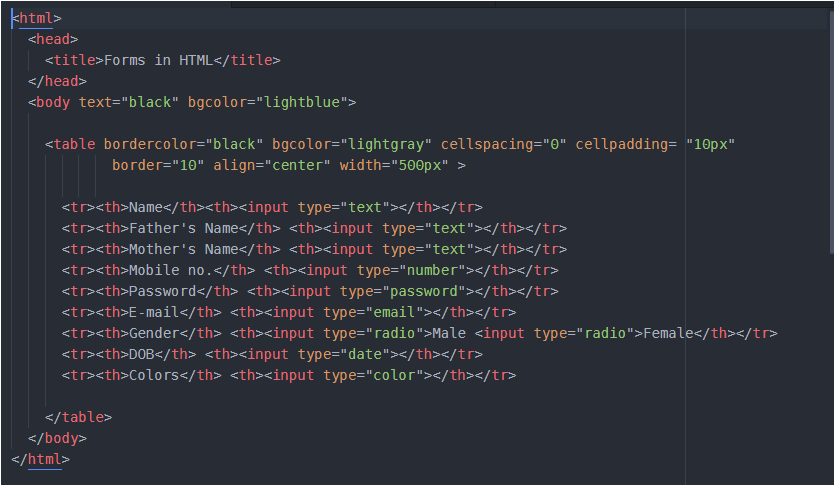
Above code looks complex, but believe me its super easy. I have first done some formatting inside the <body> just to make the page look good. You can ignore doing this.
Then, I have created a table using <table> tag. I have done some formatting here also, just to make the table look good. And I believe you are aware of all the tags and their properties used till here (till table tag).
Now, inside table tag I need to create several rows with two columns each. One column for field name other for user input.
Since I need several rows, I will use <tr> for each row and in order to store some data in it we will use <th> . Remember it is a table heading tag which makes the content inside a cell as bold and aligned at center. <input> tag is used to take input from the user.
Inside <input>, we have to specify what type of input we want from user- text( used to take input in the form of text from the user so that’s why in above code I have used it while taking the name, father’s name, mother’s name from the user) or number (used to take number from user) or email (takes email from user) or password (a secret code from user as password) or date (takes date from user) or radio button (used to allow user to choose any one option among many) or checkbox (used to allow user to choose many options or even user can select all options).
Please note that, in case of radio buttons if you select all the all the radio buttons, then all will be selected. And this is something we do not want. We want only one radio button to be selected. For this, we add one property ‘name‘ in all the radio buttons and the name for the name should be same for all. You could write something like this…
<tr><th>Gender</th> <th><input type="radio" name="gen1">Male
                              <input type="radio" name="gen1">Female</th></tr>
You can give name any name of your wish. And if you want to know the use of this name, then after completing your coding part fully run your code in browser ( run your code after reading the whole post), fill all the details and then click on SUBMIT button (adding SUBMIT button and its proper working is shown at last). After you SUBMIT, look at your web page’s URL before and after filling the form. I hope you got the thing.
To give a address field, we use <textarea></textarea> tag . It has some properties like rows, columns. You can give values as per our needs. You can very easily add this field in your form using following code-
<tr><th>Address</th> <th><textarea rows="7" cols="30"></textarea></th> </tr>
To add a qualification field in our form, we can give a drop down list to user to select any one option from that list. This dropdown list is useful than giving radio buttons because it will take much lesser space than radio buttons. So, to allow user to select any one item from the list we use <select></select> tag. After <select> , we need to give options to be displayed in the drop down list. These options are placed inside <option></option> We can add this ‘qualification’ field using following code-

To give a color field in our form, we can use input type as color. To allow user to upload his/her image we will have to use input type as file. The code for both these field will be-
<tr><th>Color</th> <th><input type="color"></th> </tr>
<tr><th>Image</th> <th><input type="file"></th> </tr>
Almost everything is added in our form, feeling Happy… Wait ! Wait ! . We have forgotten to add ‘submit’ , ‘reset’ button. We can even give an image which will act like submit button. Seeeee… the code below-

After adding your submit button, if you run your code in browser, fill details and click SUBMIT, you’ll experience no changes, nothing will take place. To make the SUBMIT work add <form> just below <body> and close </form> just before </body>.
Your final code would be like this clean code (it is really a good habit to write a clean and readable code) –
<html>
  <head>
    <title>Forms in HTML</title>
  </head>
  <body text="black" bgcolor="lightblue">
    <form >

    <table bordercolor="black" bgcolor="lightgray" cellspacing="0" cellpadding= "8px"
            border="10" align="center" width="500px" >

      <tr><th>Name</th><th><input type="text" name="name"></th></tr>
      <tr><th>Father's Name</th> <th><input type="text" name="fname"></th></tr>
      <tr><th>Mother's Name</th> <th><input type="text" name="mname"></th></tr>
      <tr><th>Mobile no.</th> <th><input type="number" name="mob"></th></tr>
      <tr><th>Password</th> <th><input type="password" name="pwd"></th></tr>
      <tr><th>E-mail</th> <th><input type="email" name="mail"></th></tr>
      <tr><th>Gender</th> <th><input type="radio" name="gen1">Male
                              <input type="radio" name="gen1">Female</th></tr>
      <tr><th>DOB</th> <th><input type="date" name="dob"></th></tr>
      <tr><th>Address</th><th><textarea rows="5" cols="30" name="add"></textarea></th></tr>

      <tr><th>Qualification</th><th><select name="qul">
                                    <option>**Select</option>
                                    <option>Phd</option>
                                    <option>Mphil</option>
                                    <option>MBA</option>
                                    <option>GateRanker</option>
                                    <option>Mtech</option>
                                  </select></th></tr>

    <tr><th>Color</th><th><input type="color" name="color"> </th></tr>
    <tr><th>Image</th><th><input type="file" name="img"> </th></tr>

    <tr><th colspan="2"><input type="submit">
                        <input type="reset">
                        <input type="image" src="wallpaper.jpg" width="50px" height="40px">
        </th></tr>

    </table>
  </form>
  </body>
</html>
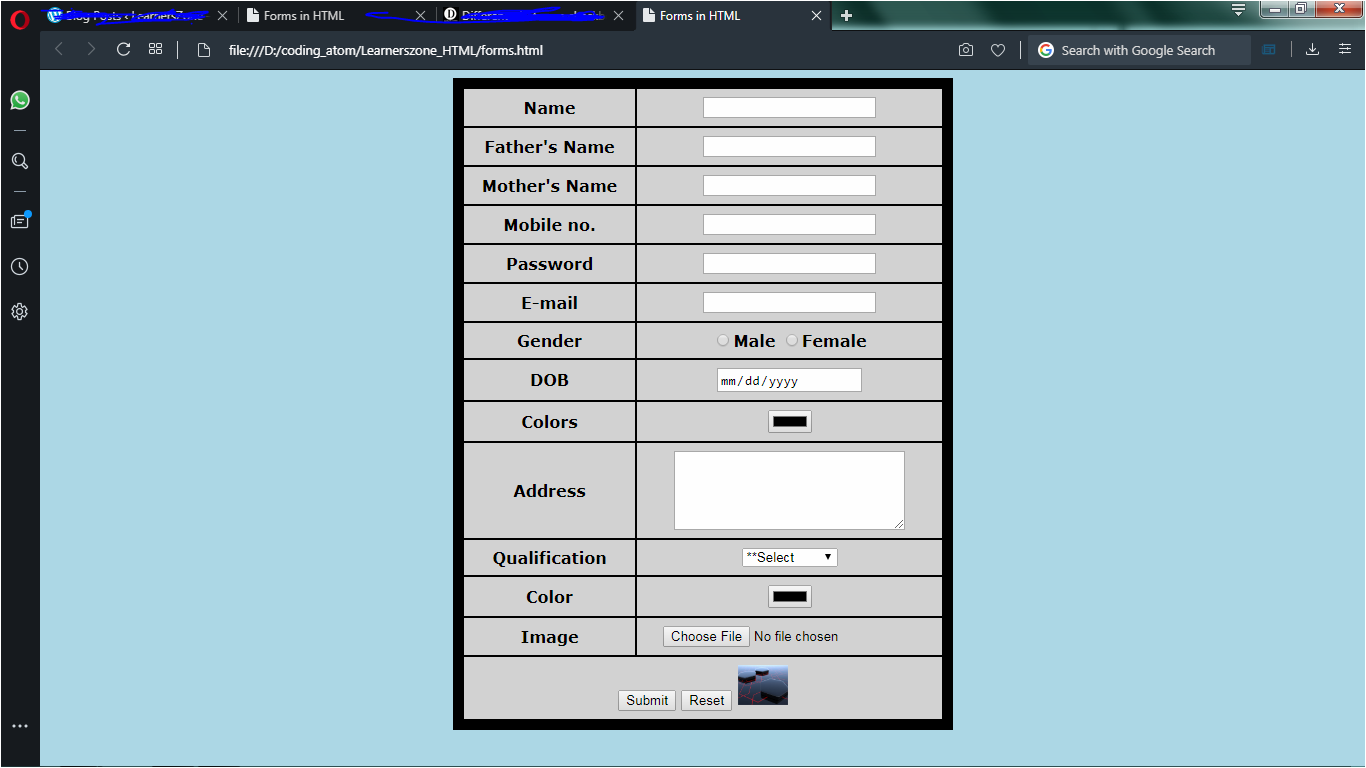
Now, our form is complete… You can save the code and run it… You will get a wonderful output. Look what I am getting in my browser…
We will see some more features in our next continued post
Have a ERROR FREE coding !
